 Fynchat
Sending a campaign, targeting, and reading results
Create a WhatsApp campaign, target a contact list with an approved template, launch it, and track its results in real time.
What are campaigns?
The Campaigns page (/campaigns) is where you send one message to a large group of customers at once over WhatsApp, using a Meta-approved template. It has two surfaces:
- Campaign list and dashboard (/campaigns) — shows all your campaigns with an overall results summary, and is where you create a new campaign.
- Single-campaign page (
/campaigns/{id}) — a live dashboard for one campaign, with all its stats, charts, message log, and lifecycle actions.
A note on permissions: Access to Campaigns is governed by account permissions. Some actions require a specific permission: creating (
campaigns.create), launching (campaigns.launch), pausing (campaigns.pause), and cancelling (campaigns.cancel). If a button doesn't appear for you, your plan or role likely doesn't grant that permission.
Creating a new campaign and targeting your audience
From /campaigns, click "New campaign" to open the create modal. This is where you set what you send and to whom. The fields:
| Field | What it does |
|---|---|
| Sender WhatsApp account | Chooses which WhatsApp account sends the campaign. This option only appears if you have more than one account, and it starts on the active account. Any account whose status is not "connected" appears disabled and can't be selected. |
| Campaign name | A free-text name for the campaign (required). |
| Message template | The template that is sent. The list shows each template by its name and language, and includes approved templates only (required). |
| Contact list (audience) | The targeting control: the contact list that will receive the message. Each option shows the list name and its contact count (required). |
| Description | A multi-line text description (optional). |
| Schedule send time | A date-and-time field to set when to send (optional). The minimum allowed value is one minute in the future. |
Audience targeting is done through the Contact list field: the list you pick determines who receives the campaign, and its contact count is your expected number of recipients.
On save:
- If you leave Schedule send time empty, the submit button reads "Create".
- If you set a time, it reads "Schedule".
After a successful create, the modal closes, the form resets, the campaign list and its metrics refresh, and a success toast appears.
WhatsApp preview and header media
On the single-campaign page, a WhatsApp-styled preview of the chosen template is rendered from the template's components: the header (text or media), the message body (BODY), the footer (FOOTER), and the buttons (quick reply / URL / phone number / copy code, each with its icon).
If the template header is an image, video, or document, you can click to upload the header file (the accepted type follows the format: JPEG/PNG images, MP4/3GPP video, or a PDF document), which is then saved to the campaign.
Launching and managing a campaign
Once created, a campaign is managed through lifecycle actions, either from the campaign-list rows or from the campaign page header:
| Action | When it appears | What it does |
|---|---|---|
| Launch campaign | For campaigns that are draft, scheduled, or paused (requires campaigns.launch) |
Starts sending. If the system returns a "needs retarget" signal (needs_retarget), it offers to move the campaign onto a connected account and then relaunch. |
| Pause | For a campaign that is sending (requires campaigns.pause) |
Pauses sending. |
| Cancel campaign | For any campaign that isn't completed or cancelled (requires campaigns.cancel) |
Cancels the campaign for good, after confirmation. |
| Reschedule | For draft, scheduled, or paused campaigns | Opens a modal to set a new send time or clear it. |
Retargeting: if the sender account is not connected at launch, the system offers to move the campaign onto a connected account; targeting shifts to that account and the launch is retried automatically.
Reading results on the Campaigns page
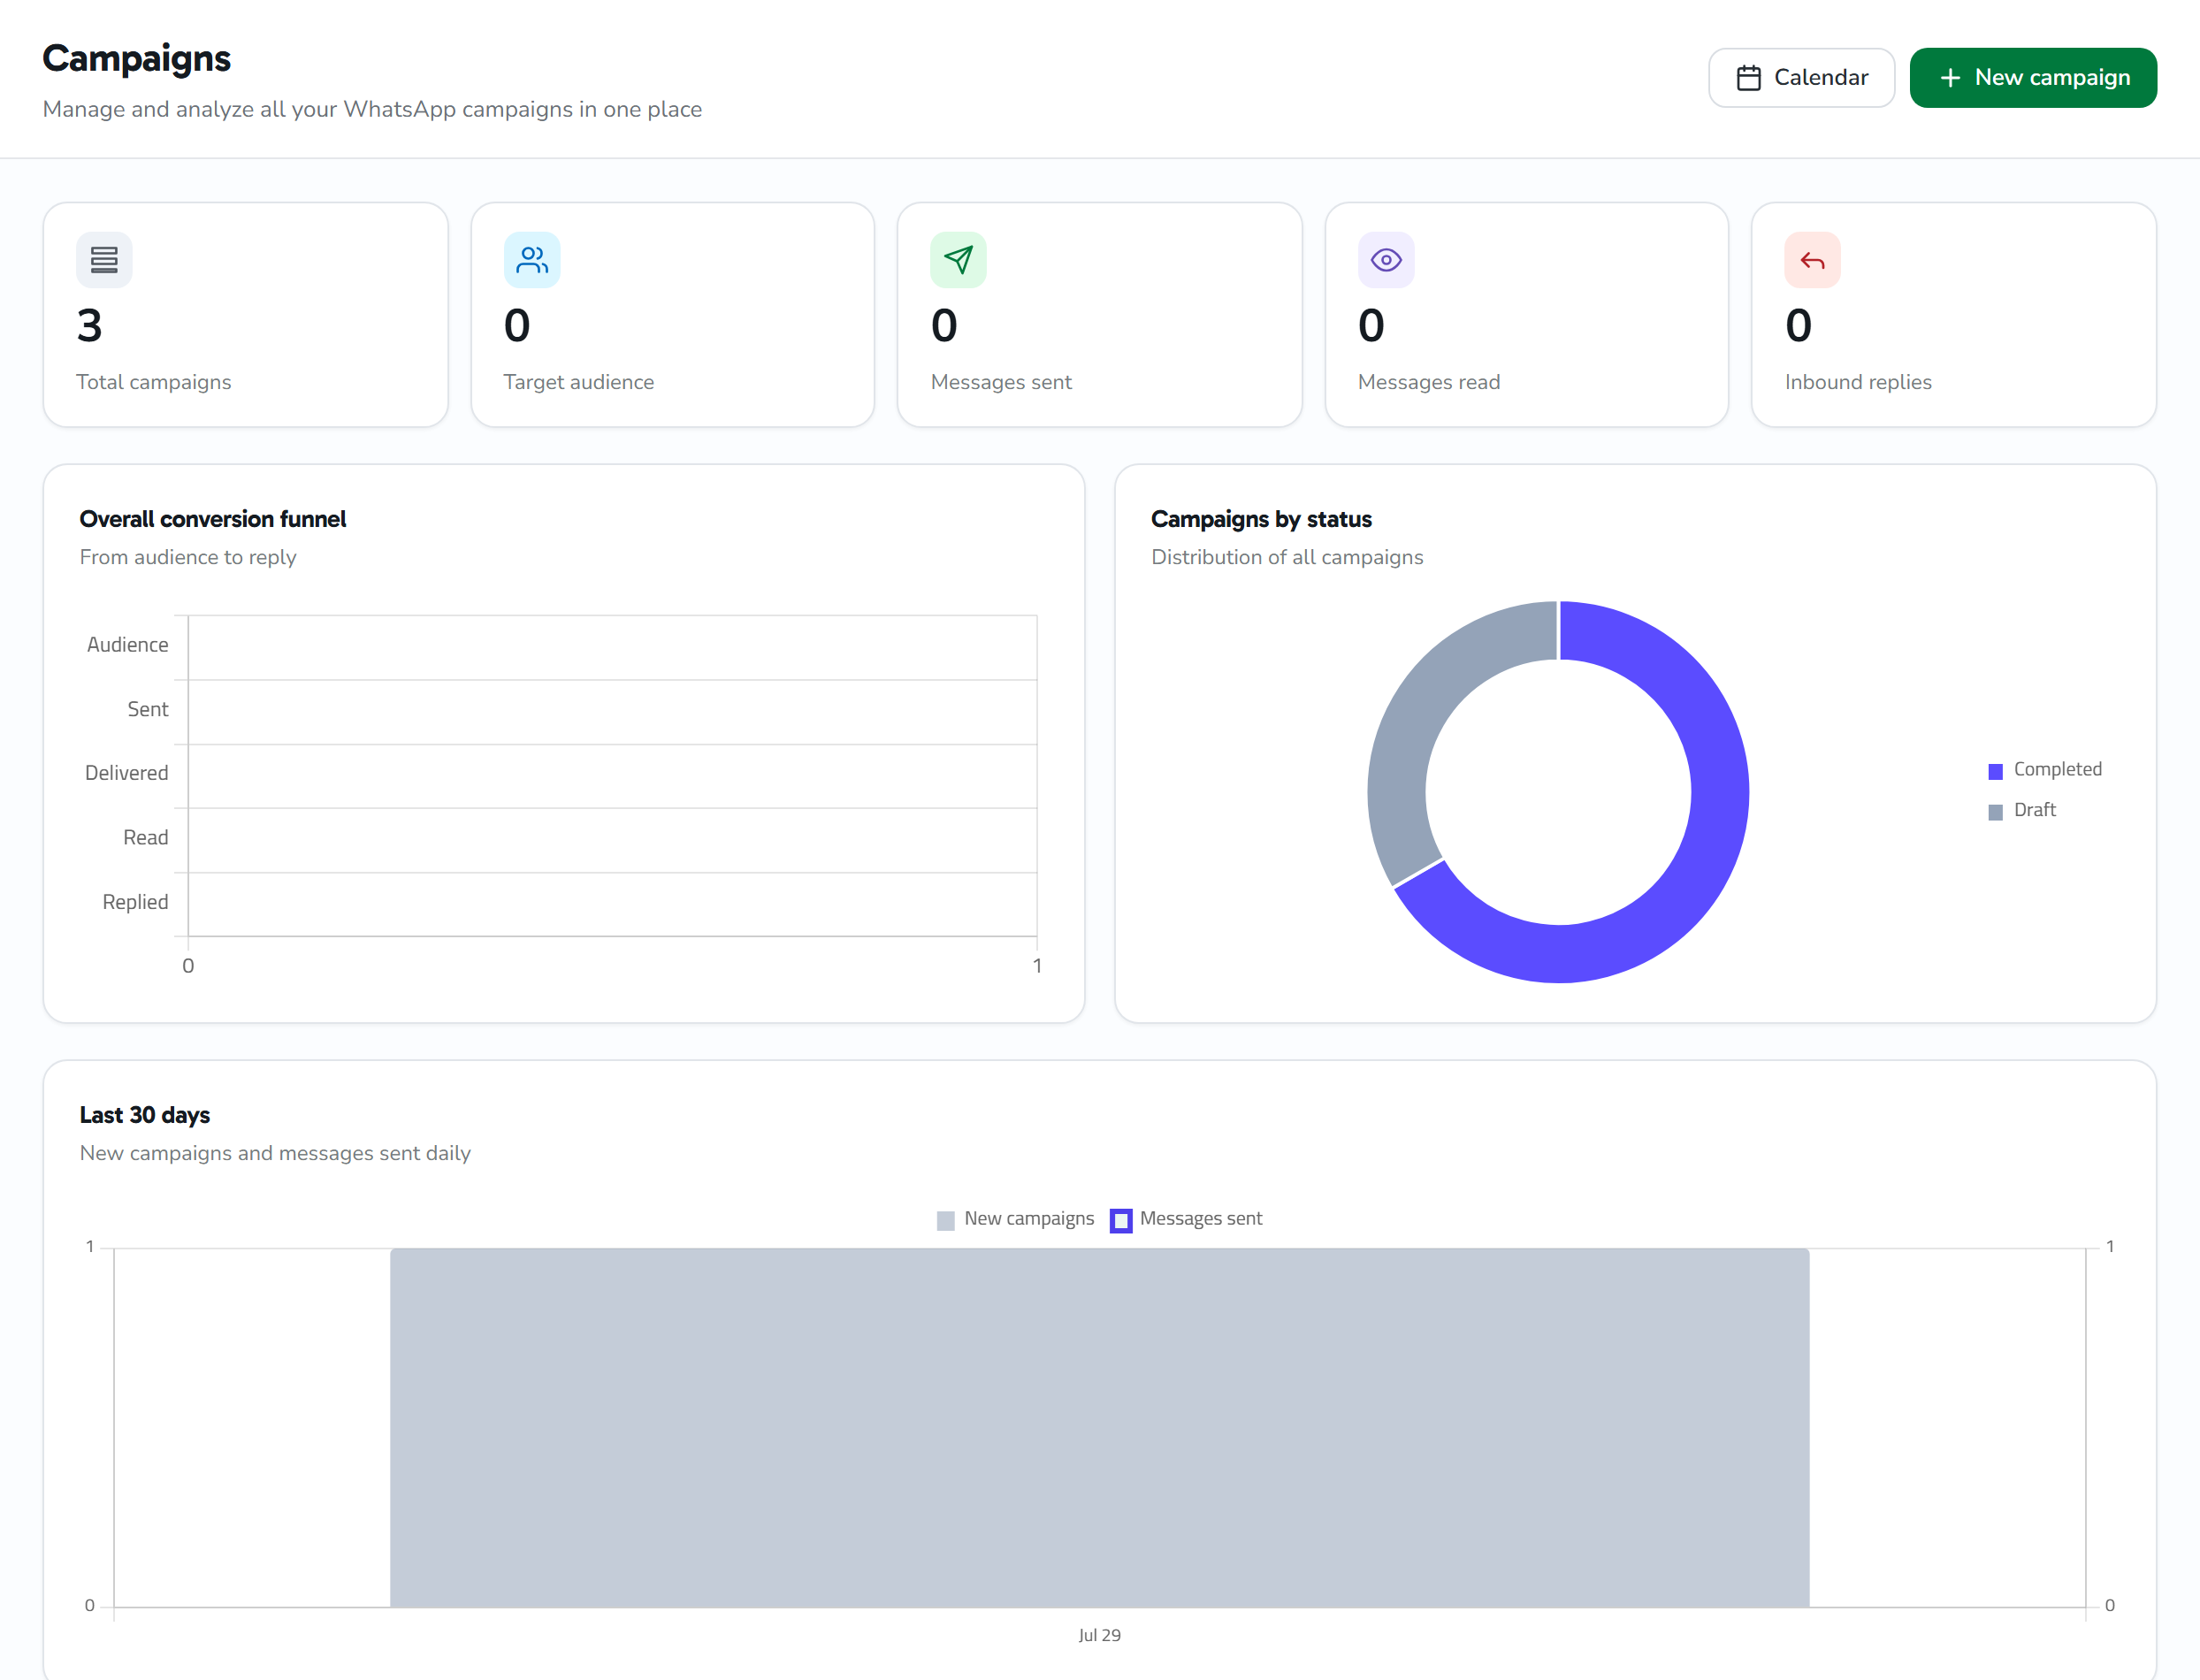
The /campaigns page gives an overall view of how all your campaigns are performing together:
- KPI strip at the top: total campaigns, total recipients, total sent, total read, and total replied.
- Overall funnel: a bar tracking the path from recipients → sent → delivered → read → replied.
- Status distribution chart: a doughnut splitting campaigns by their status.
- 30-day timeline: a bar-and-line chart comparing campaign count against messages sent per day over the last 30 days.
Each campaign row shows its stats: recipients, sent, delivered, read, and failed, plus a progress bar computed as (sent + failed) ÷ recipients. The template name and list name are shown as the campaign's targeting summary.
There is also a Campaigns calendar link in the page header that takes you to (/campaigns/calendar), a calendar view of scheduled, started, and completed campaigns.
The live campaign dashboard
The single-campaign page (/campaigns/{id}) shows results in real time: stats refresh when the page opens and then automatically every 5 seconds (unless the campaign is cancelled), so you watch the progress bar and tiles change as sending happens.
Tiles
- Primary tiles: total, sent, delivered, read.
- Secondary tiles: replied, failed, opt-outs, and unique clicks (with total clicks).
Computed rate cards
Five cards calculate their percentages automatically:
| Rate | How it's computed |
|---|---|
| Delivery rate | delivered ÷ sent |
| Read rate | read ÷ delivered |
| Failure rate | failed ÷ total |
| Opt-out rate | opt-outs ÷ delivered |
| Click rate | unique clicks ÷ delivered |
Charts
The page provides four charts: a status-distribution doughnut, a delivery funnel, a per-bucket timeline (the bucket size — minute / 5 minutes / hour / day — is chosen by the campaign's span), and a bar chart of the distribution across 24 hours.
Campaign info panel
A definition list showing: name, description, template name, target list (its name, color, and contact count), the campaign's creator, and timestamps (created, scheduled, started, completed). Template variables — if any — are shown as read-only key/value pairs.
Top errors and Auto-protect
When there are failed messages, a Top errors panel appears, grouping the 5 most frequent error groups. Each error has a human-readable title, description, and fix (from a matcher covering Meta/WhatsApp errors), plus its occurrence count and raw text.
From this panel, Auto-protect is available to handle problematic numbers:
- Open the preview first to see how many contacts would be unsubscribed or invalidated (along with how many were already handled or need no action).
- Then run it to apply, and a result toast appears.
Message log
At the bottom of the campaign page is a per-recipient log: a table showing name, phone number, a status pill, the sent/delivered/read times, and the (translated) error text if any.
- Filtering: status buttons (all + one per status) to view recipients by their status.
- Pagination: the log is paginated, 50 messages per page.
Additional actions on the campaign page
| Action | When it appears | What it does |
|---|---|---|
| Retry failed | When the failed count is greater than zero | Resends failed messages after confirmation, and reports how many were retried. |
| Send to new contacts | For completed campaigns that have a contact list | Sends to contacts added to the list after the campaign, and reports how many were queued. |
| Clone campaign | Always available | Duplicates the campaign and takes you to the new campaign's page. |
Quick tips
- Choose your contact list carefully; it alone defines the audience, and its contact count is your recipient count.
- Use scheduling to start the campaign at a time that suits your customers instead of sending immediately.
- Keep the campaign page open while sending; the stats refresh every 5 seconds.
- Review the Top errors panel and run Auto-protect to clean up problematic numbers before your next campaign.
- After a successful campaign completes, use "Send to new contacts" to reach recent joiners without building a campaign from scratch.